

 Facebook
 X
X
 Pinterest
 Copy Link
Once you’ve planned your furniture layout, the next step is turning that plan into action—and that begins with tagging your furniture and large items. This step may seem simple, but it is one of the most effective ways to reduce confusion, prevent mistakes, and ensure your move unfolds with clarity and confidence.
Tagging creates a visual roadmap for everyone involved in your transition. It helps movers know exactly where each item belongs, helps you stay organized, and prevents last‑minute decision‑making that can lead to stress or regret. Whether you’re moving to a smaller home, a senior living community, or simply reorganizing your current space, tagging is a powerful tool that keeps your plan on track.
Download the full Downsizing with Purpose workbook: https://drive.google.com/file/d/1lO7I2zElsr0Ax9-yDeisaNqMBrfGGurw/view?usp=sharing
Why Tagging Matters
When you’re downsizing, every decision counts. Tagging your furniture ensures that the decisions you’ve already made—what to keep, what to donate, what to sell—are clear and actionable.
Tagging helps you:
- Avoid bringing items that won’t fit in your new home
- Prevent movers from placing items in the wrong rooms
- Reduce the emotional and mental load on move day
- Communicate your plan clearly to family, helpers, or professionals
- Stay aligned with your furniture layout
This step turns your layout plan into a practical, easy‑to‑follow system.
Create a Simple Tagging System
Your tagging system doesn’t need to be complicated. In fact, the simpler it is, the better.
Here are a few common approaches:
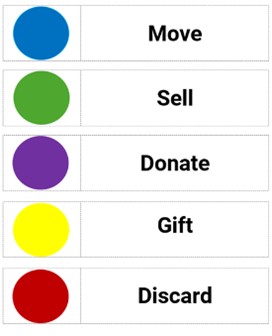
Color‑coded tags
Use different colors for:
- Items going to your new home
- Items being donated
- Items being sold
- Items going to family
- Items going to storage
Room‑specific tags
Label items based on their destination:
- Bedroom
- Living room
- Kitchen
- Office
- Storage
Priority tags
Some people like to mark:
- “Must keep”
- “Maybe”
- “Let go”
Choose the system that feels most intuitive to you.
Walk Through Your Home With Purpose
Once your tags are ready, walk through your home room by room. Use your furniture layout as your guide. Tag each item based on its destination and purpose.
As you tag, ask yourself:
- Does this piece fit my new space?
- Does it support my lifestyle today?
- Does it align with my goals for this next chapter?
If you’re unsure about an item, place it in the “Maybe” category and revisit it later with a clearer mind.
Communicate Your System Clearly
If family members, friends, or professionals are helping you, make sure they understand your tagging system. A quick explanation can prevent misunderstandings and ensure everyone is working from the same plan.
You might even post a simple “Tag Key” on the wall near your front door so helpers can reference it throughout the process.
Tagging Brings Clarity and Confidence
This step is about more than stickers or labels. It’s about turning your intentions into action. Tagging helps you stay organized, reduces stress, and ensures your move reflects the thoughtful decisions you’ve already made.
When your furniture is clearly tagged, move day becomes smoother, calmer, and far more manageable.
Key Takeaways
- Tagging turns your furniture layout plan into a clear, actionable system.
- A simple tagging method reduces confusion and prevents mistakes.
- Tagging helps you make confident decisions about what to bring and what to let go.
- Clear communication ensures everyone involved understands your plan.
Reflection Prompts
- Which tagging system feels most intuitive for your needs?
- Are there pieces of furniture you’re still unsure about—and why?
- How can tagging help reduce stress for you or your helpers on move day?
- What would make this step feel easier or more organized?
Next Up
Step 3 — Sorting and categorizing your belongings.
The Forevermore Homes Team
The Forevermore Homes Team of Coldwell Banker is here to help you move forward with clarity and intention as you prepare for your next chapter.


